To Download your CIPA Certification click here
To Download Installation Instructions click here
Steps to be followed to install the CIPA CERTIFICATE
Installation Guide for the following devices:
iPhone (iOS)
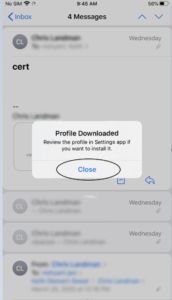
- Click here to download the certificate. Click on the “Close” button as shown below.
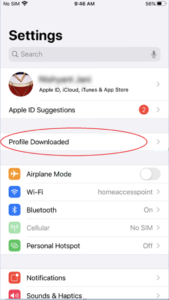
- Navigate to Settings on the iPhone. You should see a tab indicating “Profile Downloaded” as shown below. Click on the “Profile Downloaded.”
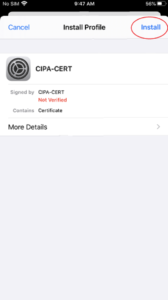
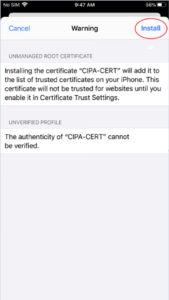
- The next screen displayed is as shown below. Click on the “Install” button.
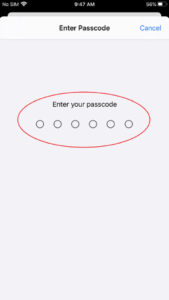
- After clicking Install, you might get a security prompt to insert your passcode. Please enter your iPhone passcode and proceed to the next step.
- The next window displays the following information. Please click on the “Install” button as indicated.
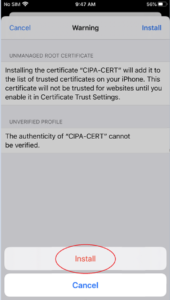
- The instructions prompt you to confirm the installation of the certificate one last time. Please click “Install,” as shown below.
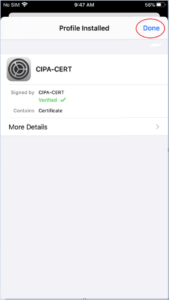
- Once the Certificate is installed, the below confirmation page is displayed. Please click “Done” as shown below.
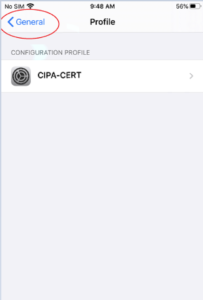
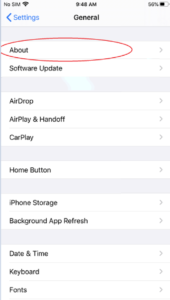
- Please click on “General.”
- The screen displays the various options under General. Please click “About.”
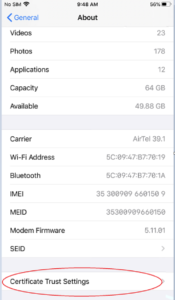
- Once you are in the About section, please scroll to the bottom and click “Certificate Trust Settings.”
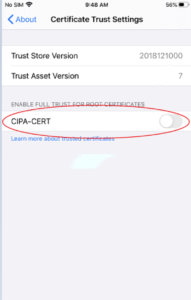
- Once you enter the “Certificate Trust Settings,” the following window is displayed. Please toggle the switch from left to right to enable the Trust for the Certificate we installed earlier.
- Once you perform step 11, the below screen should display the GREEN enabled status for the Certificate. Please click “Continue” on the information prompt.
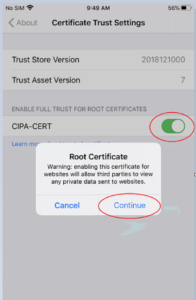
The Certificate is now installed. You can exit the settings and use the CIPA service.
Android Smartphone
- Click here to download the Certificate. The below page is displayed once you click on the downloaded Certificate. (Optionally you might be asked for your phone pattern/password to proceed further)
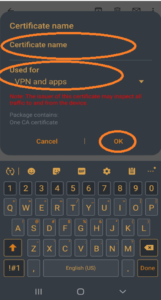
Please enter a name “CIPA-CERT” under Certificate Name.
Please select the options Used for as “VPN & apps” from the drop-down.
Please click “OK.”
The Certificate is now installed. You can now exit the settings and use the CIPA service.
Windows 10
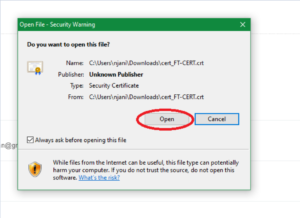
- Click here to download the Certificate. Once the Certificate is clicked, the below prompt is displayed. Please click “Open” on the Prompt.
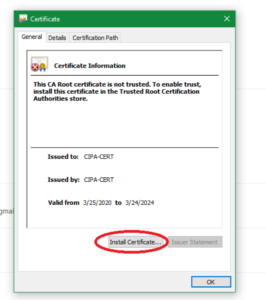
- The next dialog-box displayed is shown below. Please click on “Install Certificate.”
- Step 2 takes you to “Certificate Import Wizard.”
a. Option A — Install certificate for the current user only.
This step will setup & install the Certificate for the Current Logged-In User. As indicated below, the default selection is – “Current User,” and please click “Next.”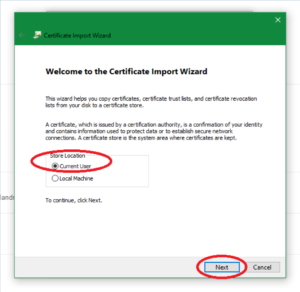 b. Option B —Install a Certificate for all the users on the system.
As shown below: Please select “Local Machine” when installing the Certificate for all the users on this machine. Please click “Next” as shown below.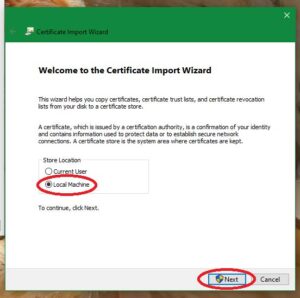
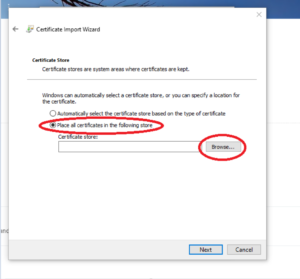
- The next prompt should display the below window. Please select “Place all certificates in the following store,” as shown below and click “Browse.”
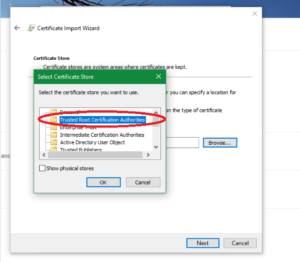
- Please select “Trusted Root Certification Authorities,” as shown below. Once selected please click “OK.”
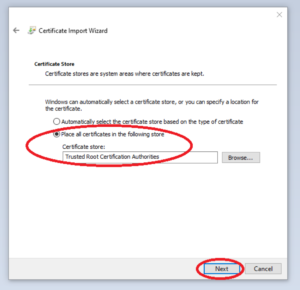
- Please verify the options selected in step 5 and then click “Next,” as shown below.
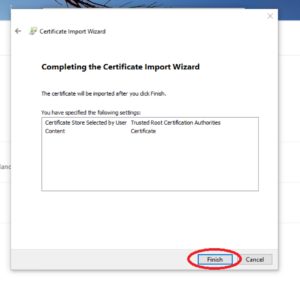
- The below window is displayed. Please click “Finish.”
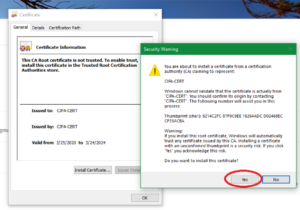
- As shown below, a similar prompt is displayed asking you to confirm the installation of the Certificate. Please select “Yes.”
- “The import was successful” message shown below is displayed. Please click “OK.”
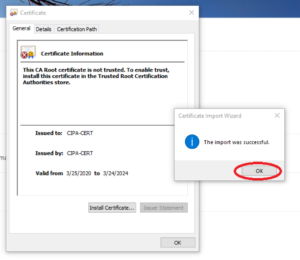
The Certificate is now installed. You can exit the settings/other windows and start using the CIPA service.
Mac OS
- Click here to download the Certificate. Once downloaded, please double-click the Certificate. You should see a dialog box as displayed below. Please read the information provided carefully. Based on your requirements, you have two options –
a. Option 1 – Installing the Certificate to be shared by all users for this machine.
b. Option 2 – Installing the Certificate for the current user logged-in.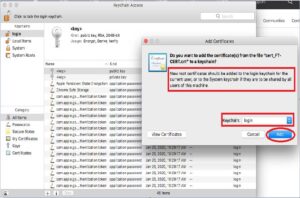
Option 1 – Installing the Certificate to be shared by all users of this machine.
Please click the drop-down menu for “Keychain” and select “System” as shown below: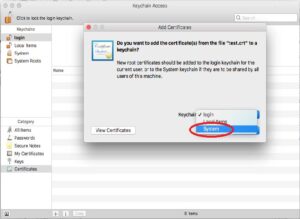
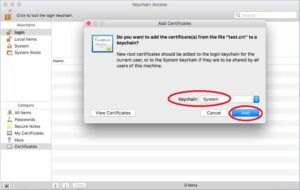
Once you have selected the “System” as the Keychain value, the screen should display the window, as shown below. Please click “Add” to proceed.
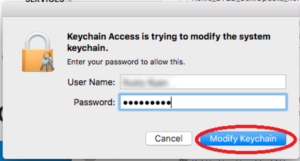
During this process you will be asked to enter your password for the system, please enter the same and click “Modify Keychain.”
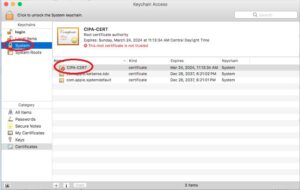
 Once you have entered the password to Modify the System Keychain, you will see a similar window, as shown below. As shown below, the Top Left Column under Keychains indicates that the Certificate is in the process of getting installed under “System.”
The next steps are identical to the steps for installing the Certificate for a single user.
Please navigate to step 2 to proceed further.
Option 2 – Select the default “login” as the Keychain value, as shown below. Please click “Add” & proceed to step 2.
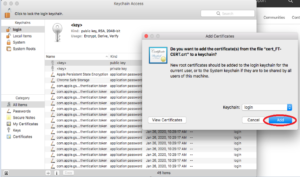
During this process you are asked to enter your password for the system, please enter the same and click “Modify Keychain” and proceed to step 2.
-
The below window will be displayed once you clicked “Modify Keychain” in the previous step. As shown below, the Top Left Column under Keychains indicates that the Certificate is in the process of getting installed under “login.”
Please double-click the CIPA-CERT, as shown in the diagram.
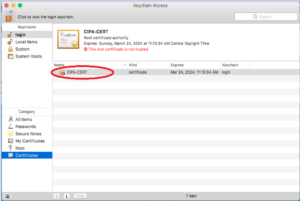
- The information about the Certificate is displayed, as shown below. Please click on the triangle (next to Trust) as shown to view the Trust settings of the Certificate.
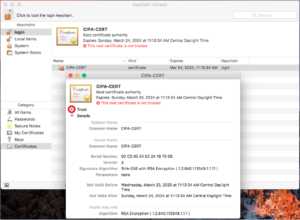
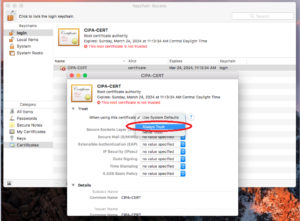
- The Trust settings are displayed for the Certificate, as shown below. Please click on the drop-down menu for “When using this Certificate:” as shown below.
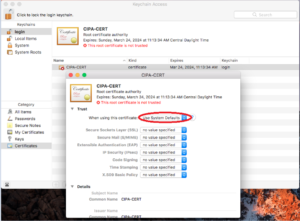
- As shown below, please select the “Always Trust” setting.
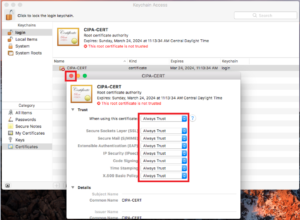
- Once you have performed step 6, the window should indicate “Always Trust” across all the settings, as shown below. Please click on the “x” to close the window and save this update to the Certificate.
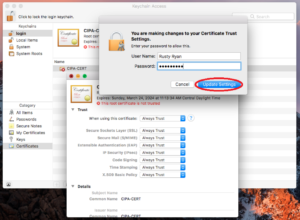
- Upon closing, you might be asked to enter the password. Upon entering the password, please click “Update Settings.”
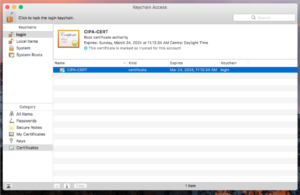
- The settings are updated instantly. You should see the following window below indicate the Certificate is trusted.
The Certificate is now installed. You can exit the settings/other windows and start using the CIPA service.
Chrome OS
Important Note
On a Chromebook, you apply SSL Certificates at the User level. This means that the Certificate needs to be installed for each user logging in (if more than one user uses the device).
Installing the CIPA Certificate (as a Trusted Root Certification Authority)
- Click here to download the Certificate. You need to use the Chrome browser to download the Certificate. If you did not download the certificate file onto the Chromebook on which you are installing it, you must transfer the certificate file to that Chromebook (e.g. via USB drive or Google Drive).
-
In the Chrome Browser of the device you are installing the Certificate on, navigate to chrome://settings as shown below.
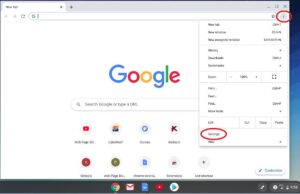
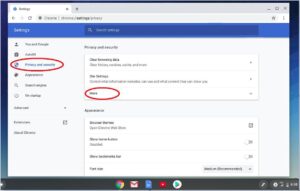
- Please click on “Privacy and Security” & then click on “More” as shown below.
-
Scroll down to HTTP/SSL, certificates settings and Click “Manage certificates” as shown below.
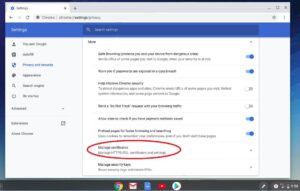
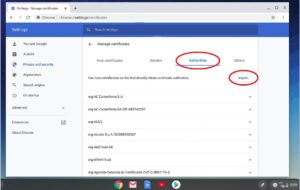
- The Certificate Manager window is displayed. Click “Authorities.” The list of the current Certificate Authorities is displayed, click on “Import” as shown below.
-
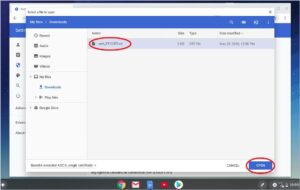
Locate the Certificate you downloaded in step 1 on the Chromebook & click “Open” as shown below.
-
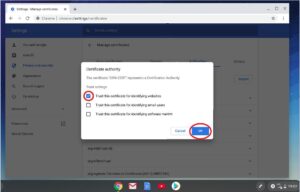
In the Certificate authority window that appears, select “Trust this certificate for identifying websites” & Click “OK” as shown below.
-
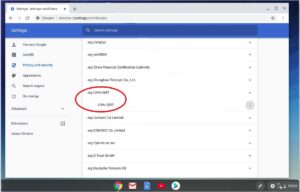
If you scroll through the list, you should now be able to see the Certificate in the list of Authorities as shown below.
The Certificate is now installed. You can exit the settings/other windows and start using the CIPA service.
Please let us know if you have issues installing the Certificate. You can email us the issues & queries at cipa_support@cyberreef.com.
